This Wedding Planner includes a Guest List and Smart Seating Chart to help you plan your wedding invitations and manage seating easily!
Here’s what we’ll cover in this guide:
Tips: Use Quick Links below to jump to the Parts.
Part 1: Guests Management – Set up wedding details, invite guests, and track their RSVPs.
Part 2: Seating Arrangements – Organize tables, assign seats, and ensure everything fits perfectly.
Part 3: Managing Meal Preferences – Keep track of dietary needs to accommodate all your guests and food catering.
Part 4: Final Wedding Summary – Use guest list summaries for seamless registration at your reception.
User Guide for Wedding Guest List & Seating Chart
Welcome! 👋 This quick guide will help you set up and use your wedding planner. We hope this planner helps to make managing your guest list, seating arrangements, meal catering and the wedding reception simple and stress-free.
PART 1: GUEST MANAGEMENT
Step 1: Setup Wedding Details
▶ In the GUEST LISTS tab, enter Bride & Groom’s name. The name would be auto-copied to all other tabs in this file.
▶ Double click cell B14 to select wedding date. A simple countdown to the wedding day would be generated.

Quick Notes
Diet Type, Group Names and Table Types can be customised at Settings tab easily.
Step 2: Shortlist Guests to be Invited
Fill in the GUEST LIST table with the following details for each guest:
- Guest Name
- Guest of (Bride/Groom/Both/Bride’s Parents/Groom’s Parents)
- Accompanying Guests (Add no. of guests for: Adult, Teen, Child, Toddler)
- Group (select 1 group for each guest, e.g. Family, Friends, Community Members)
- Contact Information
- Phone/Email: Important for reaching out to guests to follow up.
- City/Address: Useful if you plan to arrange accommodation or transport for your guests from outstation.
- If these are not needed, you can leave them blank.

Step 3: Track Guests Status & RSVP
When you have sent the invite, tick the “INVITE SENT” checkbox. This updates the guest count in the Wedding Invitation Dashboard for the quick logistics overview.
As you progress, keep track of RSVP status by ticking the box RSVP – YES or RSVP – NO.
💡 Quick Insights – Wedding Invitation Dashboard
The Invitation Dashboard offers an intuitive way to manage and track your guest list, making sure you’re always on top of things. Here’s why it’s a must-have tool for your wedding planning:
1) Guest Summary
Quickly understand the demographics of your guest list, including who invited whom—whether it’s the Bride, Groom, or Both, or even their Parents.

View the total headcount for each group (Bride, Groom, Parents, etc.) along with the percentage of total guests. This gives you a quick overview of how your guest list is shaping up and helps you balance group sizes as needed.
2) Status Overview
Effortlessly track your guest’s journey from invitation to attendance—and even after the wedding with the Thank You card status. This means you can stay organized, keep tabs on your RSVPs, and manage your guest list with ease.

Here are the status we track in this planner:
- INVITED: Guests who have been sent an invitation.
- RSVP: Guests who have acknowledged the invitation.
- RSVP – YES: Guests who have confirmed their attendance.
- RSVP – NO: Guests who have declined the invitation.
- ATTENDED: Guests who attended the wedding on the big day.
- TQ CARD: Guests who have received a Thank You card after the wedding.
3) Shortlisted Groups
This section includes all guests listed in your GUEST LIST—whether they have been invited or not. It allows you to categorize them based on demographics, ensuring you have all your groups accounted for as you move forward with planning.

You may customise the group names from the Settings tab.
PART 2: SEAT ARRANGEMENTS
Our Smart Seating Chart Planner simplifies and streamlines the process of organizing your wedding guest seating. You can define table arrangements, set maximum capacities, assign guests with ease, and automatically calculate available seats.
With its thoughtful design, you can ensure that every guest is comfortably placed,
regardless of your wedding’s size.
For larger weddings, you can even activate group-based guest assignment mode for
an even quicker and easier process.
Follow below steps to set up your seating arrangements.
Step 4: Setup Wedding Tables Details
Once you have gotten the wedding venue info from vendor, fill in the table details.

- Edit the table names (if needed): We recommend using numbers for easy reference in the seating chart, which has been prefilled. Our planner accommodates up to 60 tables. If you need more, consider our customization package. If you have fewer than 60 tables (e.g., 30), simply remove the values for tables 31 to 60. Do not delete the rows—just clear the table name cells.
- Enter the number of seats for each table.This would help us calculate available seats based on the guests assigned.
- Assign groups: Specify which group will be seated at each table.You can assign more than 1 group in a table.
When you set up the details successfully, all the information would be populated in the seating map accordingly.
Step 5: Customise Venue Map
Select the table type based on the table shape and seats
We support 4 types of tables:

- Round – 8P
- Round – 10P
- Rectangle – 8P
- Rectangle – 10P
You can easily add your own table type from Settings page. Instructions as below:

- Go to Settings tab. Under Table Types, insert table type name, i.e. Round 6 Person.
- Upload and insert image of the Table Map for the custom table type, next to the name.
- Select the table type in the SEATING CHART, and it will update all the table type images in the seats plan.
Now, you can arrange tables to the desired location. We have 6 columns and 10 rows, you can customise the map according to your venue.
Step 6: Assign Guests to Each Table
Select the main guest name: Use the dropdown to select a main guest.
Once the main guest is assigned, the total guest count (including accompanying guests) is automatically calculated. The number of available seats is also displayed in real-time.

Capacity alert: If the table exceeds its capacity, an alert will appear, prompting you to reassign guests to other tables.
Group-based easy assignment: Enable the feature to show guests by group name for faster assignment. This will add the group name to each guest’s dropdown in the seating plan, making it easier to find guests within each group when you assign them to each tables.
Filter Guest List to seats assignment: You can customize the dropdown to show only invited guests or guests who have RSVPed “Yes” from the control panel.

IMPORTANT REMARKS:
Important: Once you turn on the Easy Assignment feature and selected qualified guest list for seats assignment, disabling them after assigning guests may cause errors in the seating chart. Be sure to keep this feature on if you’re in the middle of assignments.
PART 3: DIET, MEAL PREFERENCES AND ALLERGIES
Step 7: Input Dietary Information
In the Diet Preferences section, you can log any dietary needs or restrictions for your guests.

Enter the following information:
- Main Guest Name: Select name of the main guest.
- Person Requiring Special Meal: If applicable, add the name of the guest requiring a special meal.
- Dietary Restrictions: Pre-filled options such as No Gluten, No Beef, Vegetarian, etc., are available. You can also customize these options in the Settings page to better fit your needs.
- Allergies: Note any allergies that should be considered for meal preparation.
We also populate the table name the guest gets assigned to. Hence, this list can be helpful when submitting the list to the kitchen for meal preparation.
Customisation Tips
To customise dietary restrictions selection, kindly head to “Settings” page and insert the name of the diet. You can add up to 18 Diet Types.
PART 4: FINAL WEDDING SUMMARY
To make your Wedding Day smooth, this planner generates a Wedding Reception Guest List designed to simplify check-ins at your reception. The list is auto-populated with all essential details, making it easy for the reception team to manage guest arrivals and updates in real-time.
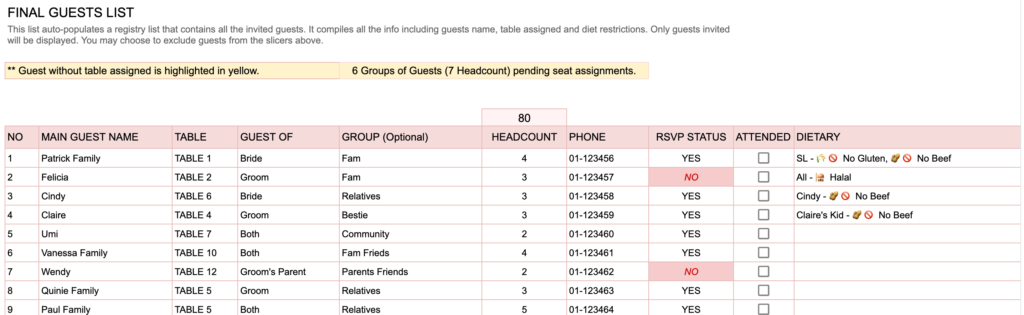
Use the FINAL GUEST LIST to:
– Confirm the total number of guests attending.
– Provide accurate meal counts and restrictions to your caterer.
– Double-check table assignments for smooth coordination.
– Locate guests using the quick filter: filter by Table Name, Group Name, Guest Of, RSVP Status for wedding logistics coordination.
The Final Guest List includes:
- Populated Important Info: Main Guest Name, Table Assigned, Guest Of, Group Name, Headcount (total number of attendees, including main guests under each main guest), Phone (Provides contact information for easy communication if needed), RSVP Status (whether the guest has confirmed attendance), Dietary Preferences and Allergies for meal coordination.
- Attended: A checkbox for the reception team to mark attendance on the wedding day.
- Remarks: For the reception team to take notes on any special information such as gifts or other important details.
- No-Table Alert: Guests who are not assigned to a table will be highlighted in yellow to remind you to assign the table for the guest.
Step 8: Print Final Guest list for Reception
For added flexibility, you can either print the guest list for your reception staff or use it digitally on a tablet or laptop. The print layout is optimized for A4 paper, ensuring a neat and professional appearance for easy use during the event. A printed list serves as a reliable physical reference, while the digital version allows for real-time updates and quick searches as needed.

Print Instructions

- Select the Area to Print.
- Select Print Icon.
- Configure Settings to print “Selected Cells”. Select the Layout: Vertical / Horizontal.
- Click Next and Print.